How To Calculate The Excavation Volume Of A Pond, Using Free Software
Designing a pond for your garden can get the creative juices flowing but the size of your pond is dependent on the size of your garden and whether you want to keep fish, or have it as a water feature.
Have you drawn your design but need to know the cost to remove material or how much water it will hold?
The difficult part of any pond project is calculating the excavation cut volume to tell you how much material you will need to remove and/or the water volume of your pond. We’ll run through how to use Kubla Cubed Lite (free version) to calculate the excavation volume which is particularly useful if you were building a larger retention pond or detention basin. Below is a video which covers similar content.
Here we demonstrate how it can be used to build a pond in your garden. The same techniques can be applied to larger scale projects, for example a detention basin or retention pond.
Drawing tools to create 2D plans
Whichever medium you choose to create your plan, ensure you draw it to a scale and save it as a pdf. Here are just two drawing options:
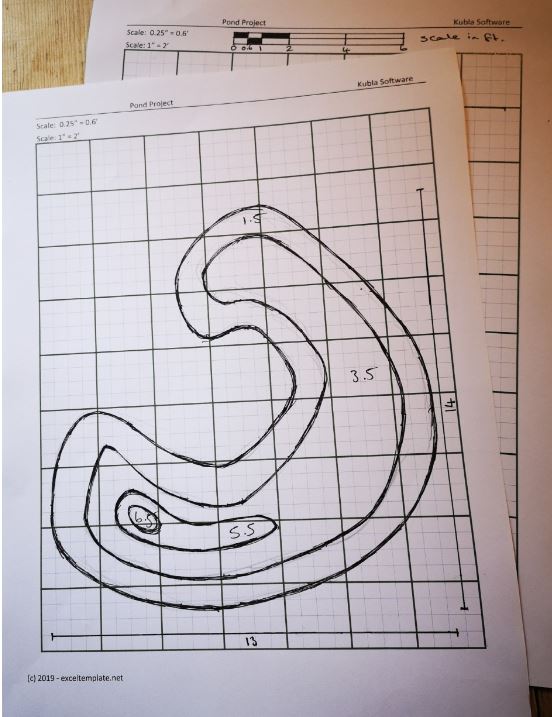
Draw your plan with pen and paper
If you hand draw your plan, using graph or engineering paper makes it easier to do it to scale. Once done, scan your drawing into your PC as a pdf. or jpg. file. If you don’t have graph paper, you can download and print paper from The Spreadsheet Page. They have loads of great templates for free.
Getting started with Kubla Cubed
To start with, download and install the latest version of Kubla Cubed Lite. It is free to download and use commercially, plus there is no time limit. Some features of the professional version are restricted in the Lite version, however, we do not need those for this task.
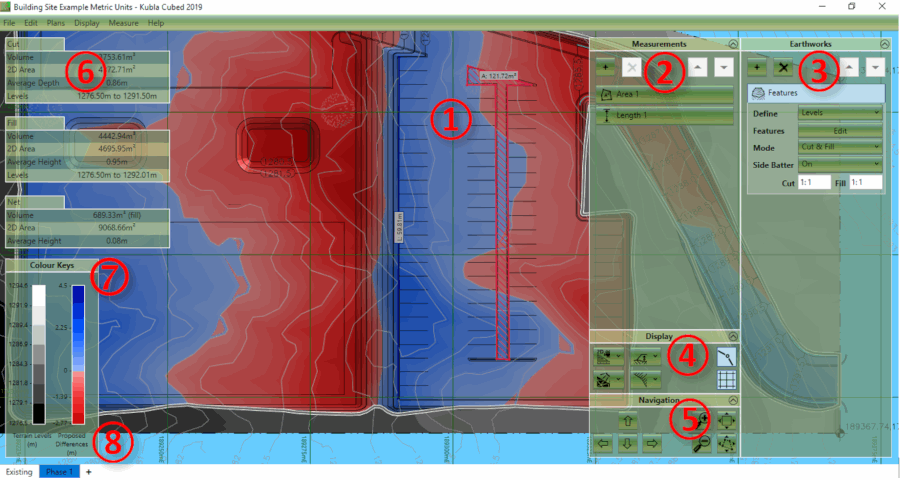
The different elements of the Kubla Cubed (above) user interface are briefly described below:
① Design Area – This is the main display, where the existing ground and the proposed earthworks will be displayed.
② Measurements Panel – This panel is used for adding, removing and editing the measurement elements, e.g. lengths, areas, counts.
③ Earthworks Panel – This panel is used for adding, removing and editing the earthworks elements, which are combined together to create a proposed surface.
④ Display Panel – This panel is used for changing various display options, e.g. camera controls, lighting and grid lines.
⑤ Navigation Panel – The controls in this panel can be used for zooming, panning and rotating (in 3D) the views.
⑥ The Results Panel – The results panel shows an overview (cut, fill, net) of the earthworks estimation for the current phase. A more detailed analysis can be produced in a report or spreadsheet.
⑦ The Colour Keys – These colour keys show the shading which is used to display the existing and proposed topography.
⑧ Construction Phases – At the bottom of the screen, the first tab shows the existing ground; subsequent tabs show phases of proposed earthworks.
Notes on Display Units : Before starting, it is worth making sure the display units are set the same as your survey points file. Kubla Cubed can display either metric or imperial (English) units. These will initially be set to a default value depending on the regional settings of the computer. However, this setting should be checked by clicking Measure in the menu bar and then Display Units.
After the display units are set correctly, it is a good idea to first familiarise yourself with the basic layout.
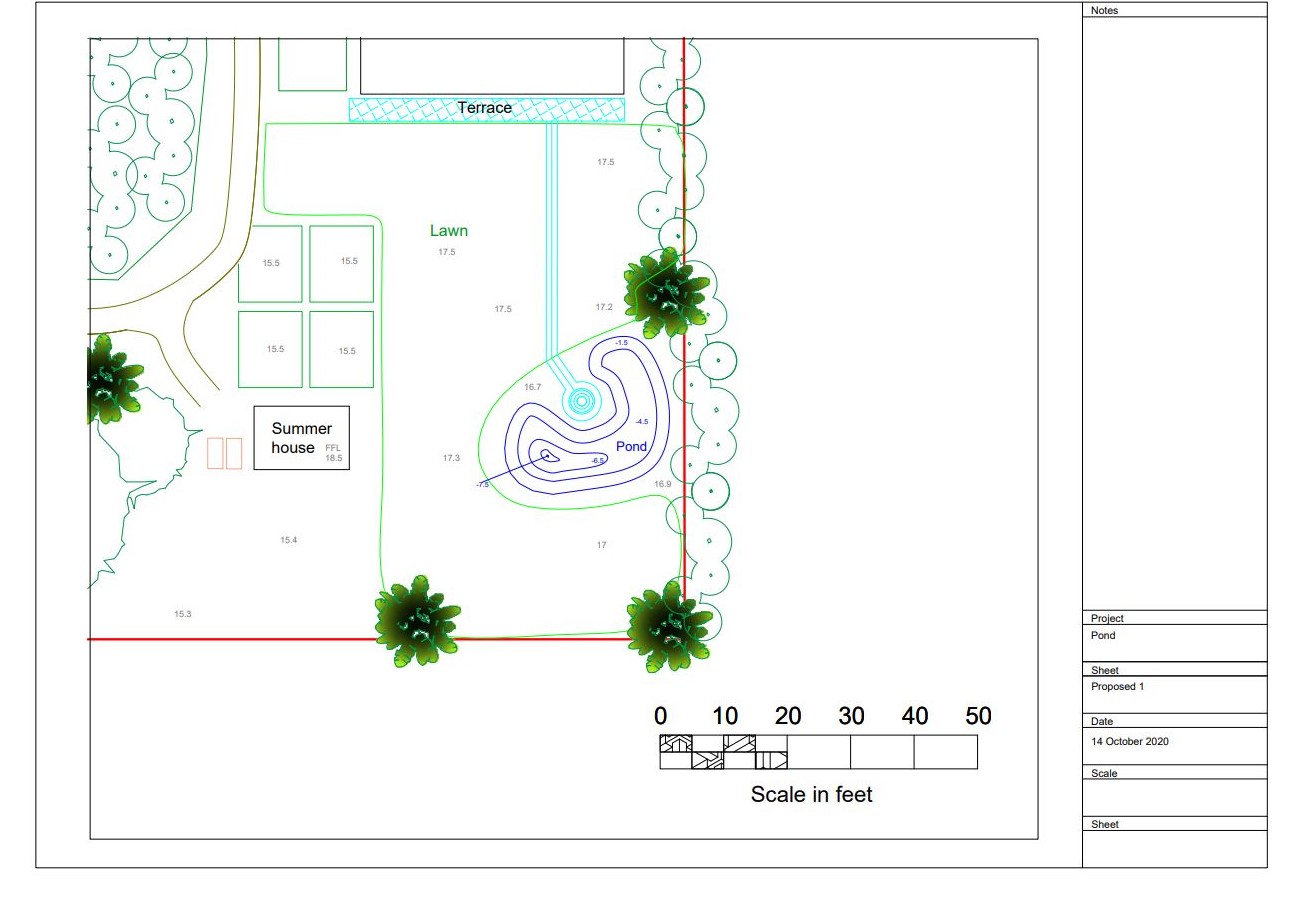
Import your pond drawing into Kubla Cubed
Now that you are familiar with some of the features of the software, it is time to import your 2D pond drawing.
To do this click Plans, and then Add Image/PDF File, then locate and open your file. Your plan will then load and show in your project.

Once your .pdf is imported, you must set the correct scale to accurately calculate the cut volume.
To do this, click on Scale. Depending on how you have scaled your drawing (i.e. by ratio or a scale bar) will decide which method you use. Choose the format you have; either click By Scale and enter the ratio – double check the page size matches, or click By Length draw a line along a known length by clicking the left mouse button at the start and end of the line, then type the value of the known length.
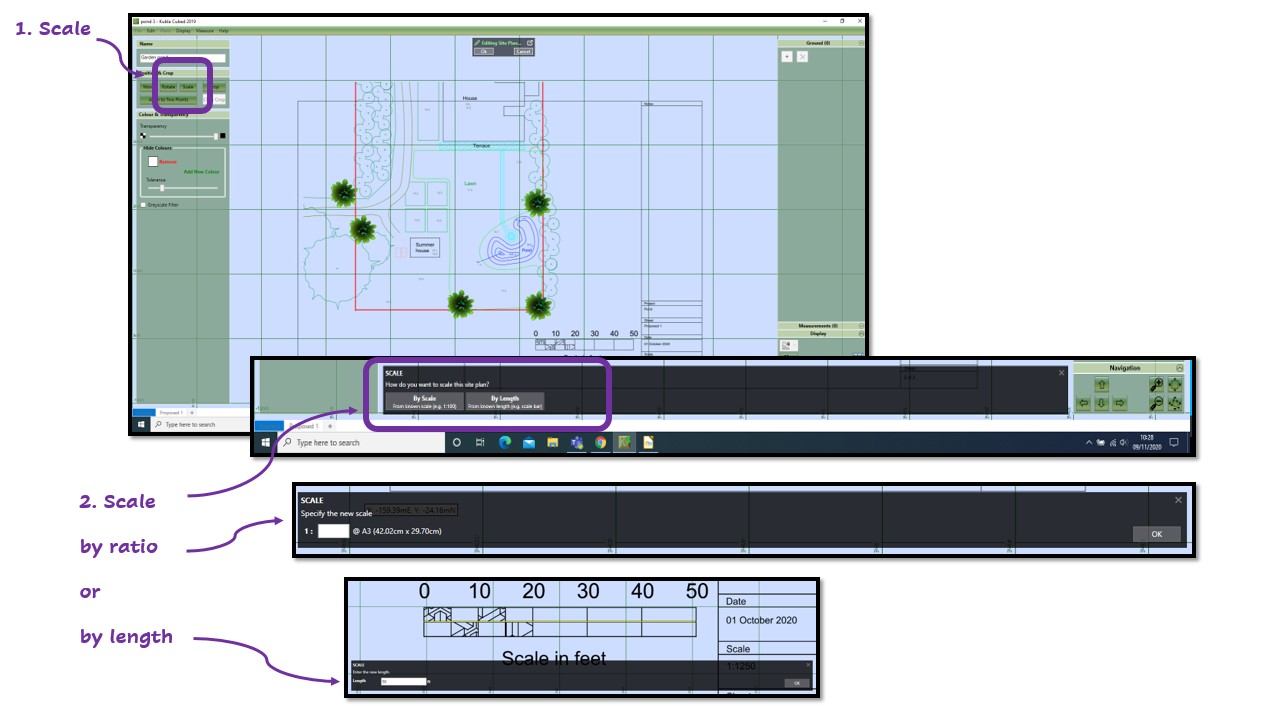
Checking the Scale : It is critical in this exercise that your image has the correct scale. So after importing, it is worth checking the scale with the ‘Quick Measure Tool’. To activate the quick measure tool hover your mouse over the point you want to measure from and press the M key. Whilst keeping the M key pressed, move the mouse to the next point and then a line between the two will be displayed with a label showing the distance. The measure tool can be used in any window where project data is displayed.
First off, you must create your existing surface in Kubla Cubed. This gives the existing ground levels for where you want to dig your pond.
There are two surface scenarios:
flat or undulating/sloping surfaces – both are created using the Feature Surface tool. Below gives a break down for each scenario.
1. You have a flat existing surface
When a survey has not been done and the surface can be approximated to flat use the Define Fixed Level Tool.
A flat surface or plane (area with one level) is created following these steps:
→ Feature Surface → Outline → Draw → Define Fixed Level
→ Draw the outline with your mouse
→ Add a level e.g. 0
→ Click Finish
→ Click OK
2. You have an undulating existing surface
When a survey has been completed and there are known ground elevations the extrapolate tool can take this data and approximate the remaining surface area.
To do this, follow the steps below:
→ Feature Surface → Outline → Draw → Extrapolate
→ Draw the outline with your mouse
→ Click Points
→ Add the points and their values
→ Click Finish
→ Click OK
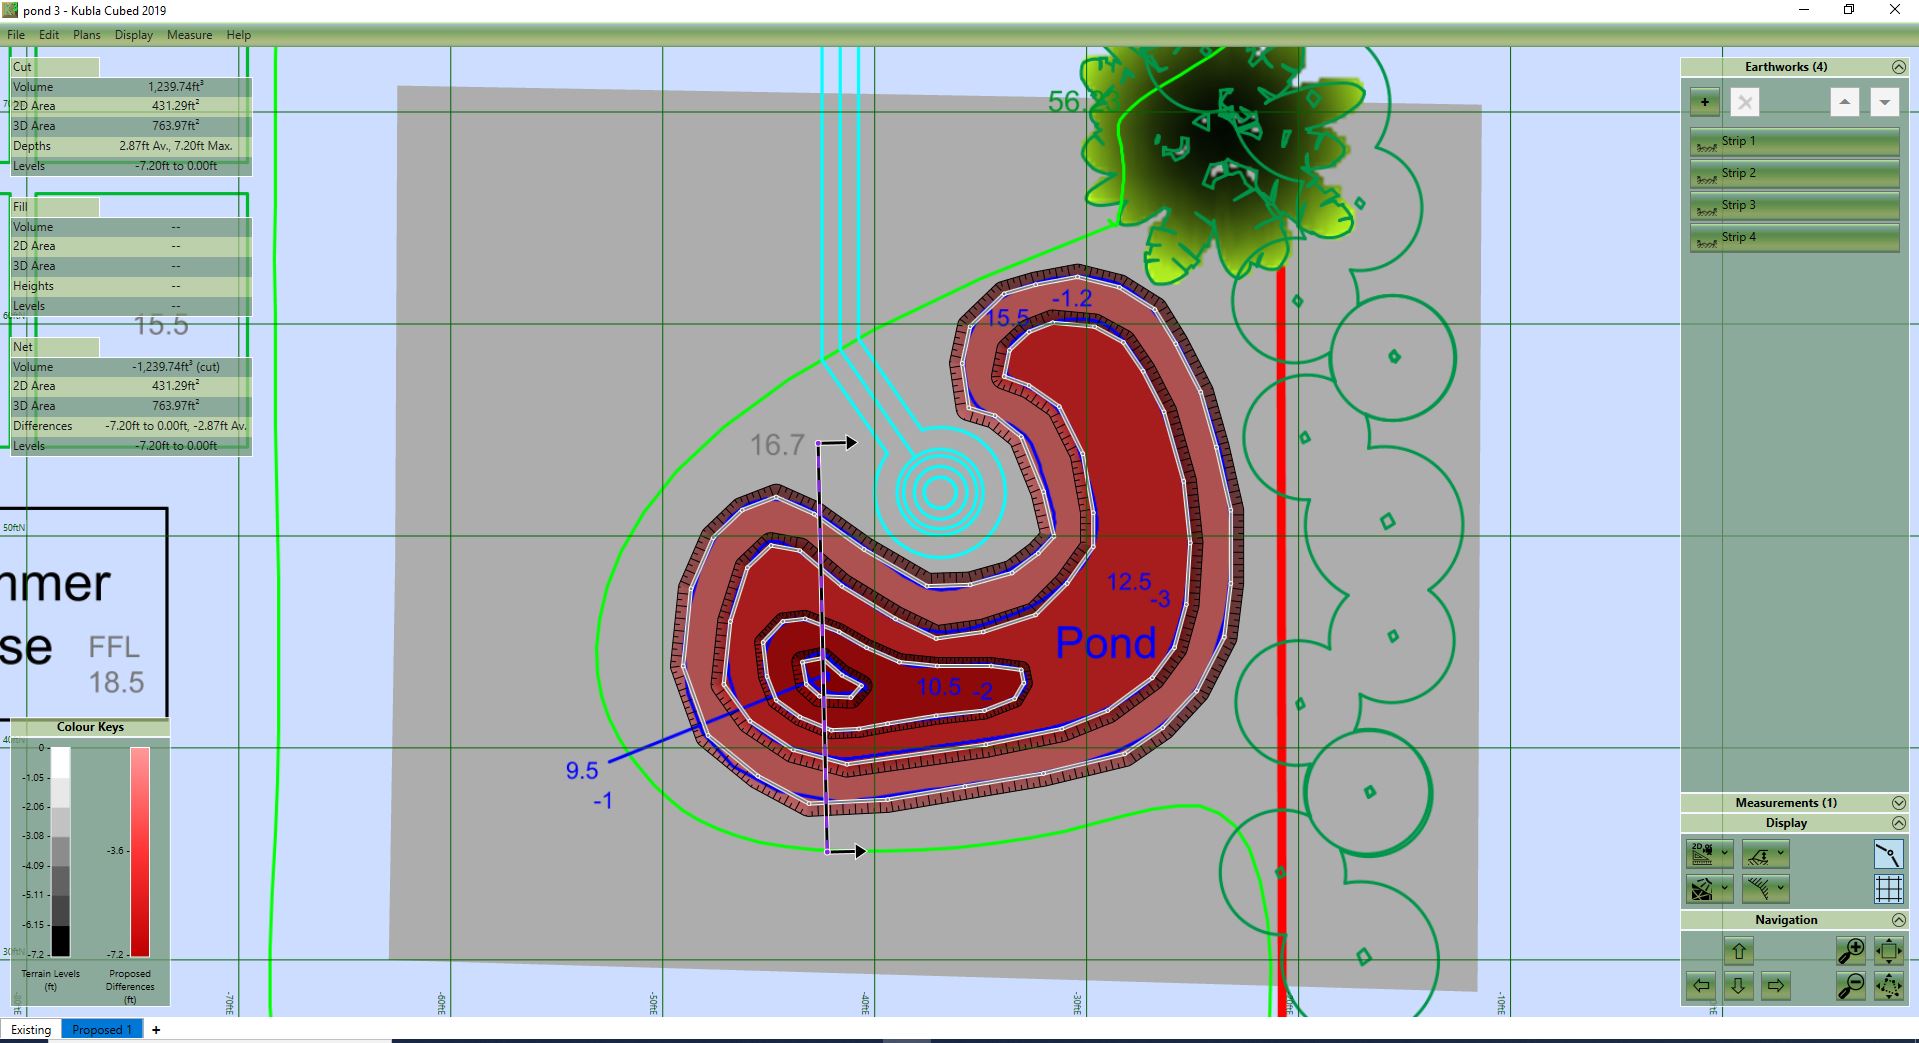
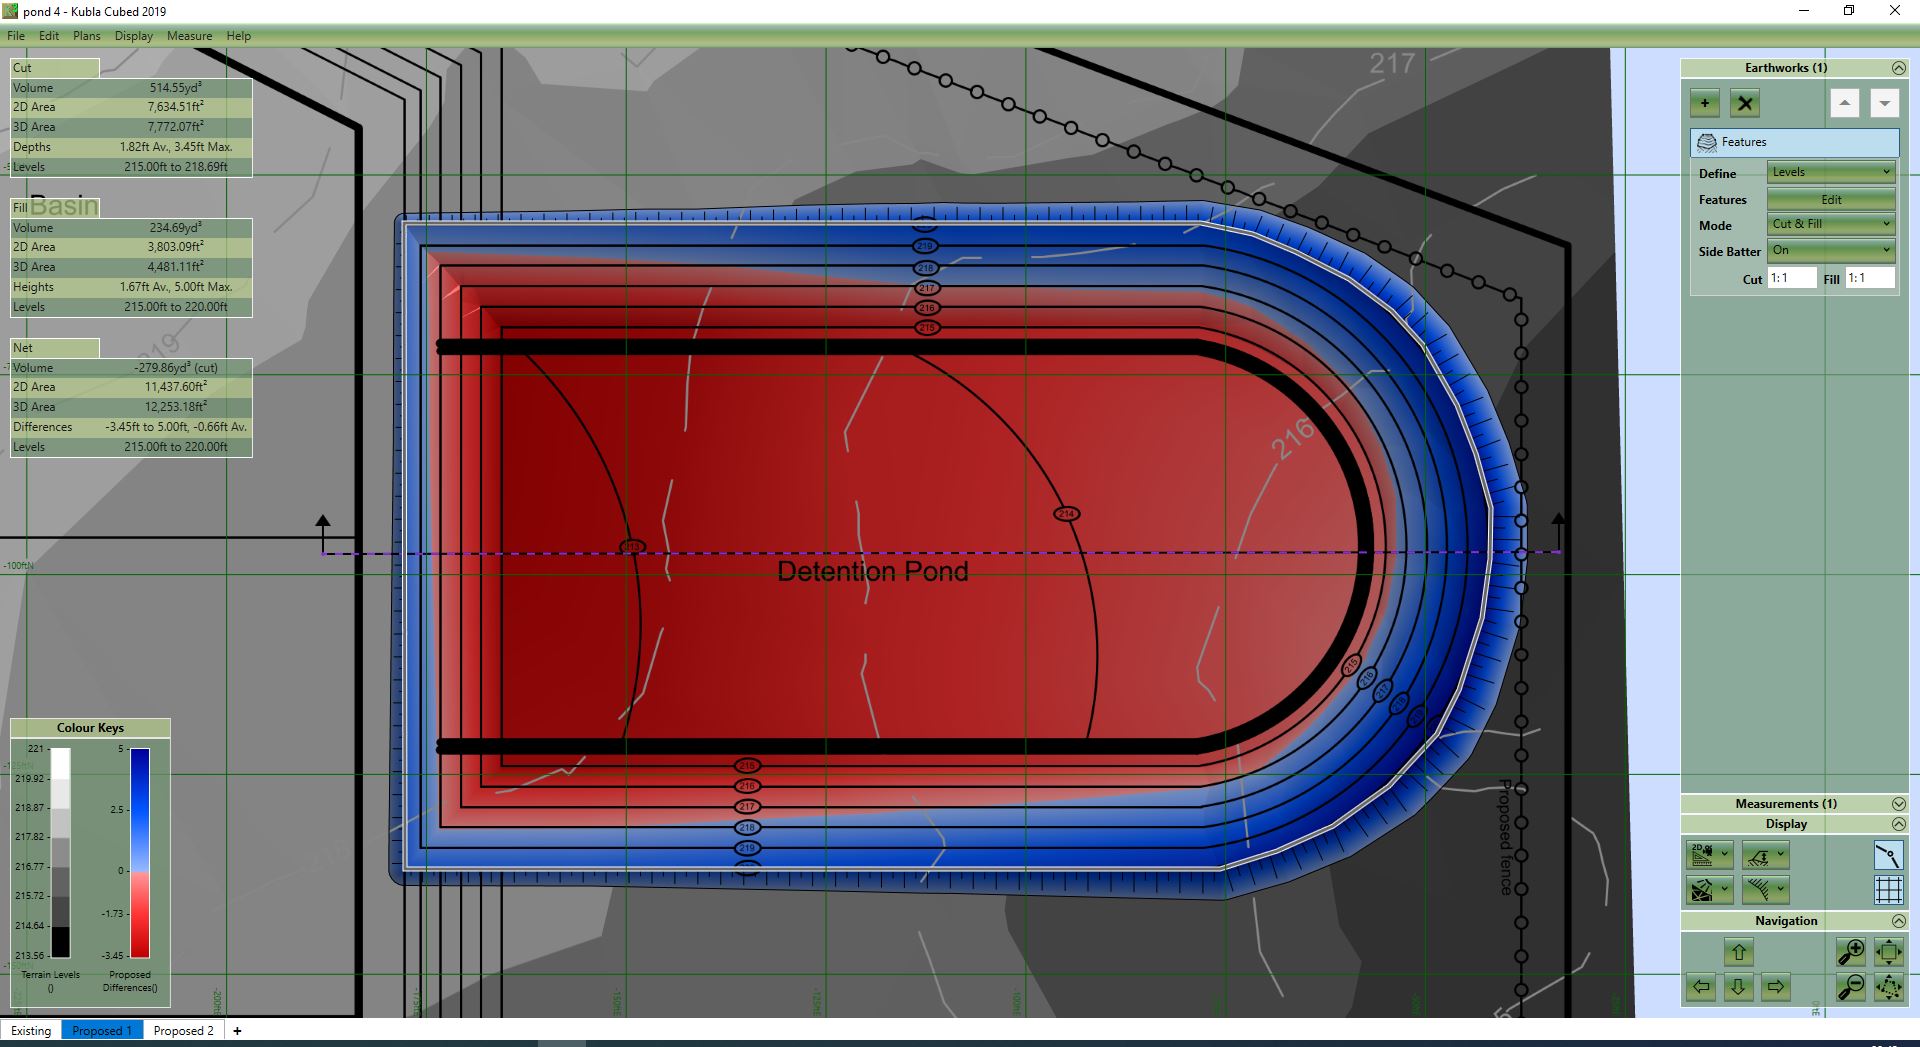
Now the existing surface has been defined you can calculate the cut volume by adding your proposed surface. Ponds tend to have multiple shelves or terraces and so to define the different depths, we add multiple strips. The strips are cumulative and so the depth of two (or more) strips combine to give you their total depth.
The video above, demonstrates this process.
→ Select the Proposed 1 tab
→ In the Earthworks tab, click “+” (Add) and Strip
→ Draw your first (perimeter) layer of your pond.
→ Amend the depth and side batter
→ Then repeat
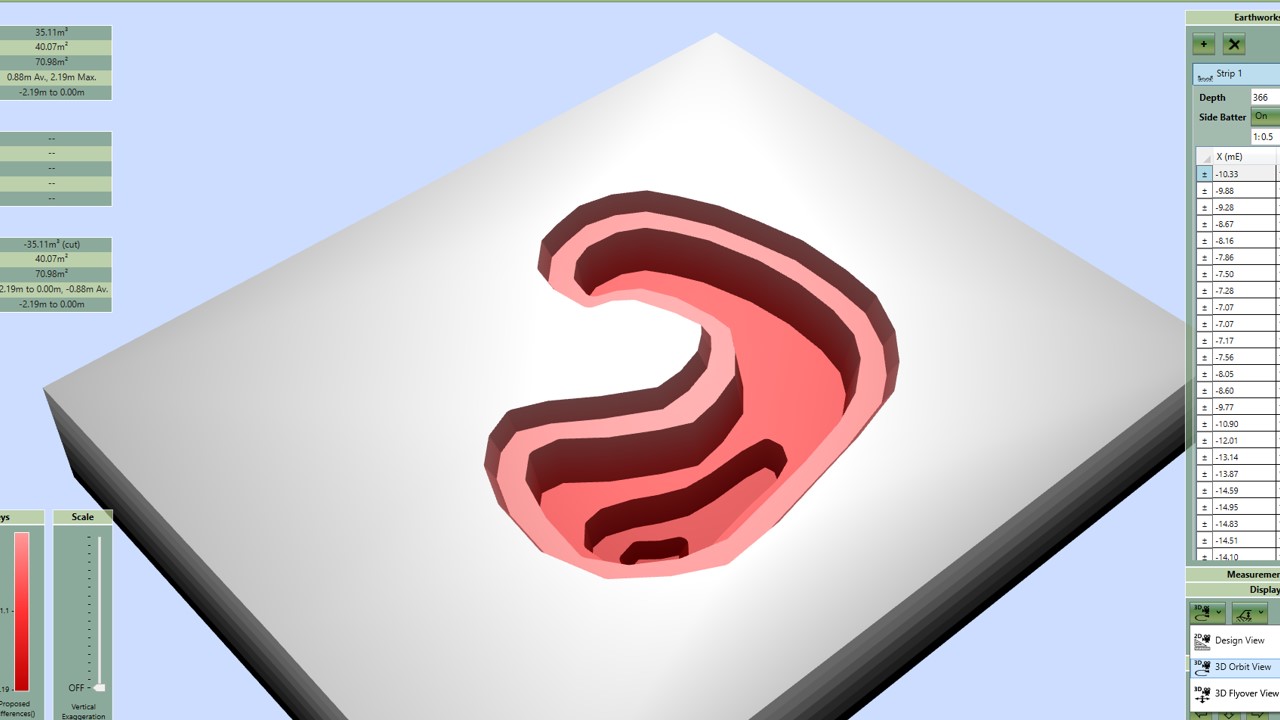
After adding each strip, I would recommend you click the 3D Orbit View for a 3D visualisation of your surface. This highlights errors and the Vertical Exaggeration tool accentuates these further. You can then adjust your outlines, depths and side batters as needed.
Flicking from the 2D to 3D Orbit View makes it possible to check the depths and side batters are correct and to make any necessary changes.
The total cut or excavation volume for your pond is shown at the top left of your screen. You can then use this figure to calculate how long it will take to remove and the cart-away costs.
And that’s it. As easy as that, now you can calculate pond excavation volumes with free software tools.
What more can I do in Kubla Cubed 2019 Professional?
While in Kubla Cubed Lite, you can complete all of the above and calculate your pond volume. You may need some additional tools to complete your project.
Here are three features that you can find in the professional version that you can use to give you more information while creating reports for your pond project.
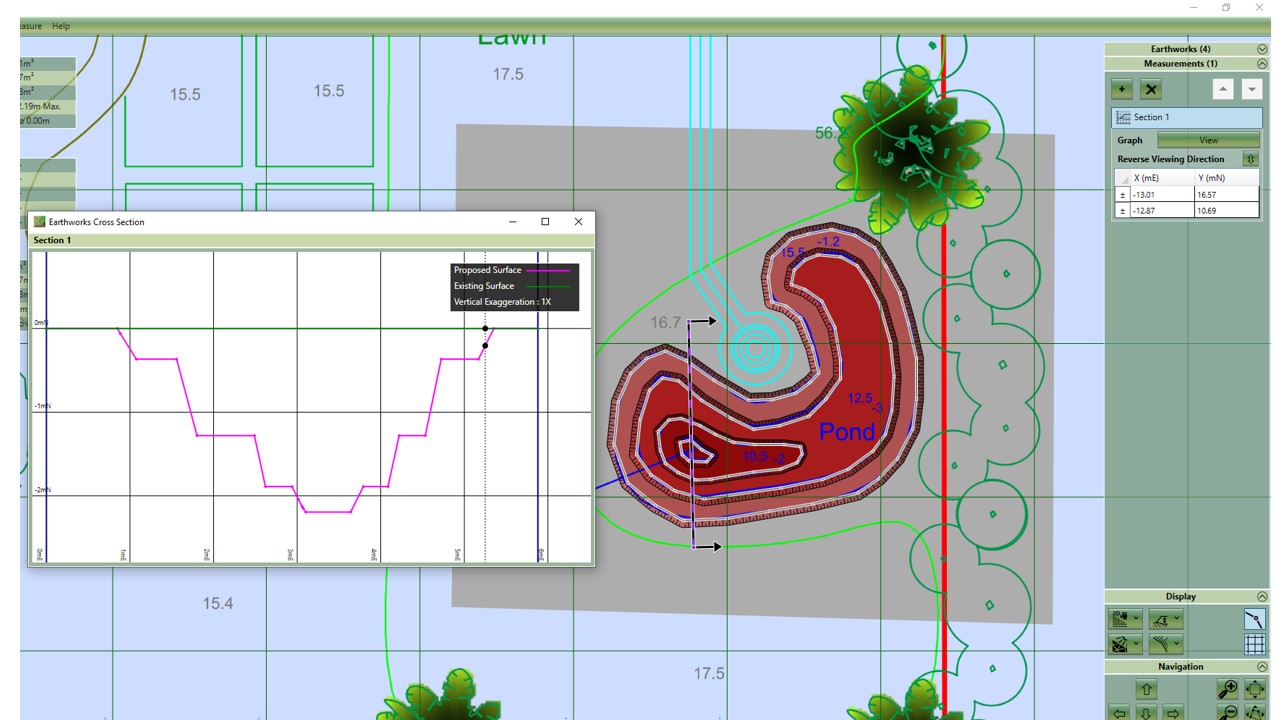
View cross-sections of your pond
Draw a line across a section of your pond to view the cross profile. Using the Cross-Section tool, you can view the graph which shows the existing and proposed surface levels. If you wish, you can export the graph as a CAD file, PDF or spreadsheet.
Here is a video which covers Cross Sections.
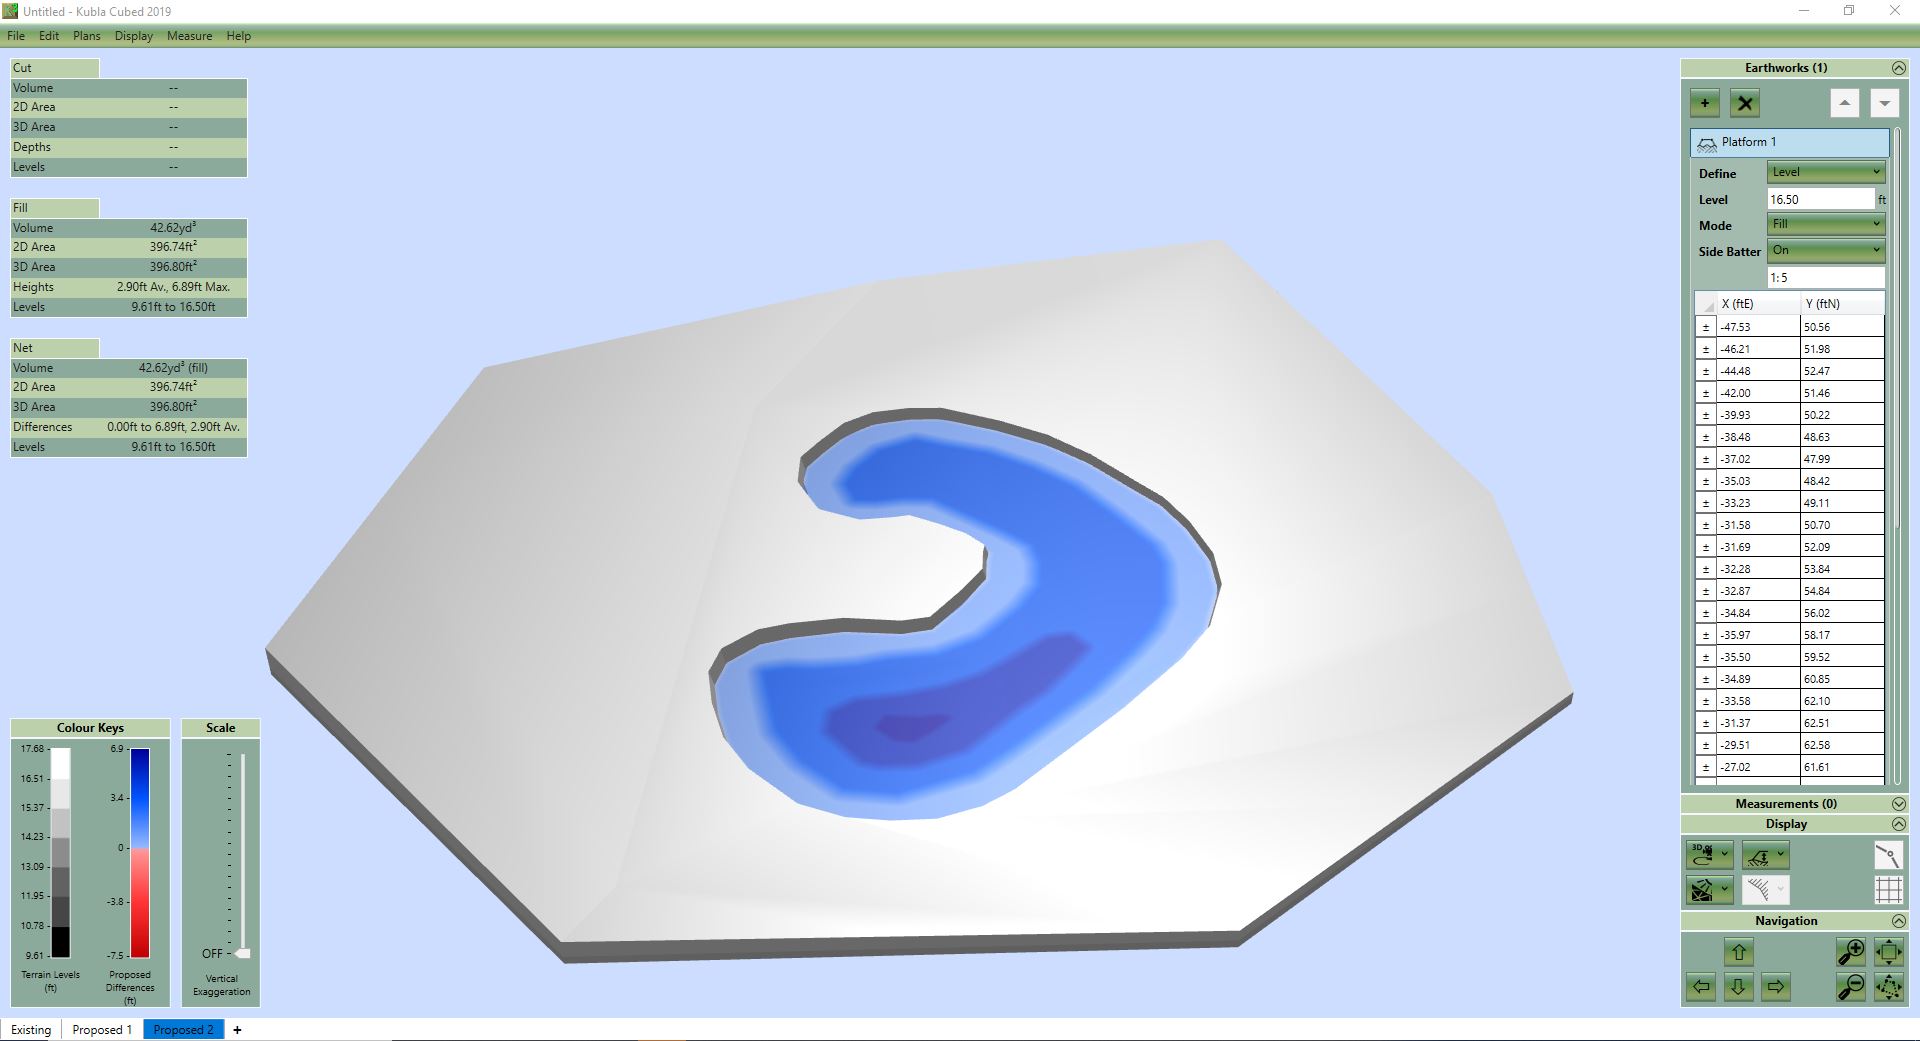
Define a third surface to calculate the water capacity/fill volume
Add a third tab to your project, this is automatically called Proposed 2.
Then when you add the Platform element over your pond area you can calculate this.
Define your pond layers using contour lines
Use contour lines to define your pond’s layers. This is an alternative to using Strips and is useful with larger ponds e.g. a detention pond.
Good luck with your projects!
- Re-watch How to calculate pond excavation volume
- Price list / Buy Kubla Cubed 2019 Professional
- More articles