The process once you have clicked on the button to add a new elevation feature on-screen depends on the type of feature you have selected. In all cases you draw the features in the design area on the right of the screen.
-
Outlines
When you choose to add an outline, the following prompt will appear, providing two options to create outlines.
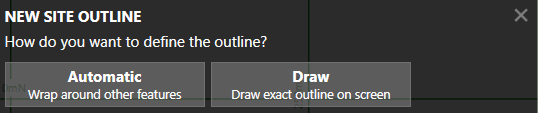
- Automatic outline. If you choose this option the software will automatically create outlines, based on the features that you have defined. This process is analogous to wrapping a rubber band around the features that you have already defined to create an outline. You will be able to adjust how much this 'rubber band' is 'sucked in'.
-
Draw. If you choose this option you will draw an exact outline on the screen. You will be provided with a number of options to set the levels for this outline:
- Extrapolate from other Features (Default): Takes the levels from nearby elevation features that you have defined (e.g. contour lines and points).
- Define Varying Levels: Allows you to set levels for the outline which vary at each point. This can be used if you need maximum control of the surface outline elevations.
- Define Fixed Level: Allows you to set a single level for the outline, this is only used in very unique scenarios.
- Use Ground Levels: Snaps the Outline elevations to the ground (This can only be used with a feature surface used to define proposed earthworks)
When you choose you preferred option follow the steps to completed the outline. Once you have finished you will see the prompt below.
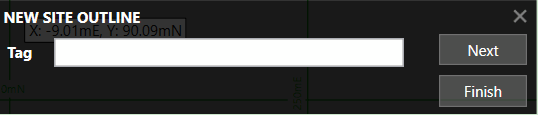
You can define a Tag for the Outline if you wish. Click Next to draw another Outline, or Finish to stop drawing Outlines.
-
Contour Lines
Draw each point of the Contour Line by left clicking on the designer panel. Finish drawing the contour by right clicking, or by pressing the enter key. The following prompt will appear:
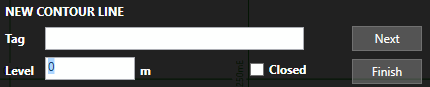
You should type the level for the Contour Line into this prompt. You can also define a Tag if you wish. Lastly if the Contour Line is a closed loop you can click the Closed checkbox. Click Next to draw another Contour Line or Finish to stop drawing Contour Lines. Note that the '...' before the 'Level' input box can be used to adjust the levels you type. E.g. if all of your levels start from an elevation of 1000 you can click on '...' and input '1000+'. You can then type, for example '26' into levels box and this will be converted into '1026'. This can save time in some take-off scenarios.
-
Point Levels
Draw the Point Level by left clicking on the designer panel. The following prompt will appear:
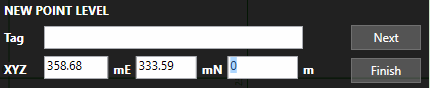
You should type the level for the Point Level into this prompt. You can also type X and Y values for precise positioning. If you wish, you can type a Tag for the Point Level. Click Next to draw another Point Level or Finish to stop drawing Point Levels. Note the comment on 'Contour Lines' above regarding the '...' in front of the level input box.